wireguard 分流

wireguard 客户端可以配置成, 根据 IP 段选择 连接对应的wireguard 服务器端? 例如 wireguard 客户端IP 为 192.168.10.0/24 时, 连接 wireguard 服务器A端, 33.33.33.33 wireguard 客户端IP 为 192.168.20.0/24 时, 连接 wireguard 服务器B端, 44.44.44.44 wireguard 客户端IP 为 192.168.30.0/24 时, 连接 wireguard 服务器C端, 55.55.55.55 wireguard 客户端 安装在openwrt 中, wireguard 服务器端 安装到 centos 服务器中, 有 3台服务器 A,B, C

解决方案

方案一:用 luci-app-pbr(VPN Policy-Based Routing)

1) 安装

opkg update
opkg install luci-app-pbr pbr
#(如未装 WG)
opkg install wireguard-tools kmod-wireguard

2) 配 3 条 WireGuard 接口(/etc/config/network)

关键点:三个接口分别指向 33.33.33.33 / 44.44.44.44 / 55.55.55.55;为避免默认路由被抢占,关闭 route_allowed_ips(或 AllowedIPs 不设 0.0.0.0/0)。

config interface 'wgA'
  option proto 'wireguard'
  list addresses '10.8.0.2/32'       # 你在 A 服务器分给 OpenWrt 的隧道 IP
  option private_key 'XXXXX'
  option peerdns '0'
  option mtu '1420'                  # 视需要调整
  option metric '50'                 # 防止干扰主路由

config wireguard_wgA
  option public_key 'PUBKEY_A'
  option endpoint_host '33.33.33.33'
  option endpoint_port '51820'
  option persistent_keepalive '25'
  list allowed_ips '0.0.0.0/0'       # 让隧道可承载全流量
  option route_allowed_ips '0'       # 但不自动加默认路由

config interface 'wgB'
  option proto 'wireguard'
  list addresses '10.9.0.2/32'
  option private_key 'YYYYY'
  option peerdns '0'
  option mtu '1420'
  option metric '50'

config wireguard_wgB
  option public_key 'PUBKEY_B'
  option endpoint_host '44.44.44.44'
  option endpoint_port '51820'
  option persistent_keepalive '25'
  list allowed_ips '0.0.0.0/0'
  option route_allowed_ips '0'

config interface 'wgC'
  option proto 'wireguard'
  list addresses '10.10.0.2/32'
  option private_key 'ZZZZZ'
  option peerdns '0'
  option mtu '1420'
  option metric '50'

config wireguard_wgC
  option public_key 'PUBKEY_C'
  option endpoint_host '55.55.55.55'
  option endpoint_port '51820'
  option persistent_keepalive '25'
  list allowed_ips '0.0.0.0/0'
  option route_allowed_ips '0'

防火墙:把 wgA/wgB/wgC 加到一个 vpn zone(出方向 ACCEPT,或转发到 WAN),LAN 允许 forward 到 vpn

3) 策略路由(/etc/config/pbr)

config pbr 'config'
  option enabled '1'
  option strict_enforcement '1'
  option verbosity '1'

config policy
  option name 'LAN10_to_A'
  option src_addr '192.168.10.0/24'
  option interface 'wgA'

config policy
  option name 'LAN20_to_B'
  option src_addr '192.168.20.0/24'
  option interface 'wgB'

config policy
  option name 'LAN30_to_C'
  option src_addr '192.168.30.0/24'
  option interface 'wgC'

重启网络/服务:

/etc/init.d/network restart
/etc/init.d/pbr restart

4): DNS 防泄漏

/etc/config/dhcp(dnsmasq)

  • 关闭本机 DNS 监听(只当 DHCP 不当 DNS)
  • 各网段通过 DHCP option 6 下发各自专属 DNS
    你可以用自己三台服务器的隧道侧地址(例如在服务器 A/B/C 上监听 10.8.0.1/10.9.0.1/10.10.0.1 的递归或转发 DNS),也可以用公共 DNS。下面给两套写法,你选其一。
config dnsmasq
  option domainneeded '1'
  option boguspriv '1'
  option authoritative '1'
  option noresolv '1'
  option port '0'          # 关闭本机53端口,路由器不提供DNS

# 按你的实际接口名修改(示例假设 br-lan10/20/30 对应的 dhcp 段名为 lan10/lan20/lan30)
config dhcp 'lan10'
  option interface 'lan10'
  option start '100'
  option limit '100'
  option leasetime '12h'
  # 下面两行二选一(只保留你选的那行!)
  # 【A 方案:用服务器A的隧道侧DNS】(建议跑 unbound/dnsmasq 在 10.8.0.1)
  # list dhcp_option '6,10.8.0.1'
  # 【B 方案:用公共DNS(示例Cloudflare)】
  list dhcp_option '6,1.1.1.1,1.0.0.1'

config dhcp 'lan20'
  option interface 'lan20'
  option start '100'
  option limit '100'
  option leasetime '12h'
  # 【A:服务器B】
  # list dhcp_option '6,10.9.0.1'
  # 【B:公共DNS(示例Google)】
  list dhcp_option '6,8.8.8.8,8.8.4.4'

config dhcp 'lan30'
  option interface 'lan30'
  option start '100'
  option limit '100'
  option leasetime '12h'
  # 【A:服务器C】
  # list dhcp_option '6,10.10.0.1'
  # 【B:公共DNS(示例Quad9)】
  list dhcp_option '6,9.9.9.9,149.112.112.112'

若采用【A 方案】,请在三台 CentOS 上各自开一个本地 DNS(unbound/dnsmasq 任一),监听隧道 IP(如 10.8.0.1),并允许递归到公网;这样天然“所有 DNS 一定走隧道”。

5): /etc/config/firewall(严格拦截 53,只放行白名单 DNS)

为每个网段添加两条规则:允许到“白名单 DNS”的 53拒绝其它 53
(下面示例分别给出 A/B 两种上游写法,保留你实际使用的 IP)

######## LAN10 -> 只许到 A 方案的 10.8.0.1(或 B 方案的 1.1.1.1/1.0.0.1) ########
config rule
  option name 'LAN10 allow DNS to A(or CF)'
  option src 'lan10'
  option proto 'tcpudp'
  option dest_port '53'
  # A 方案(服务器A在隧道侧的DNS)
  # option dest_ip '10.8.0.1'
  # B 方案(Cloudflare)
  option dest_ip '1.1.1.1 1.0.0.1'
  option target 'ACCEPT'

config rule
  option name 'LAN10 block other DNS'
  option src 'lan10'
  option proto 'tcpudp'
  option dest_port '53'
  option target 'REJECT'

######## LAN20 -> 只许到 B 方案的 10.9.0.1(或 8.8.8.8/8.8.4.4) ########
config rule
  option name 'LAN20 allow DNS to B(or Google)'
  option src 'lan20'
  option proto 'tcpudp'
  option dest_port '53'
  # A 方案(服务器B)
  # option dest_ip '10.9.0.1'
  # B 方案(Google)
  option dest_ip '8.8.8.8 8.8.4.4'
  option target 'ACCEPT'

config rule
  option name 'LAN20 block other DNS'
  option src 'lan20'
  option proto 'tcpudp'
  option dest_port '53'
  option target 'REJECT'

######## LAN30 -> 只许到 C 方案的 10.10.0.1(或 9.9.9.9/149.112.112.112) ########
config rule
  option name 'LAN30 allow DNS to C(or Quad9)'
  option src 'lan30'
  option proto 'tcpudp'
  option dest_port '53'
  # A 方案(服务器C)
  # option dest_ip '10.10.0.1'
  # B 方案(Quad9)
  option dest_ip '9.9.9.9 149.112.112.112'
  option target 'ACCEPT'

config rule
  option name 'LAN30 block other DNS'
  option src 'lan30'
  option proto 'tcpudp'
  option dest_port '53'
  option target 'REJECT'

6): 服务器端(CentOS)最小可用示例(每台一份)

以 A 为例(B/C 同理改端口与网段):

/etc/wireguard/wg0.conf

[Interface]
Address = 10.8.0.1/24
ListenPort = 51820
PrivateKey = <SERVER_A_PRIVKEY>

# 打开转发 + NAT(iptables 版本,nft/火墙按需替换)
PostUp   = sysctl -w net.ipv4.ip_forward=1 ; iptables -t nat -A POSTROUTING -o eth0 -j MASQUERADE
PostDown = iptables -t nat -D POSTROUTING -o eth0 -j MASQUERADE

[Peer]
# OpenWrt(wgA)的公钥
PublicKey = <OPENWRT_PUBKEY_FOR_A>
AllowedIPs = 10.8.0.2/32

B/C 建议用不同的隧道网段(如 10.9.0.0/24、10.10.0.0/24),便于区分与排错。
启动:

systemctl enable --now wg-quick@wg0

7): 在 CentOS 服务器上开“隧道侧 DNS”

举例:在 A 服务器(10.8.0.1)用 dnsmasq 作转发器(轻量、够用),B/C 同理改 IP。

/etc/dnsmasq.d/wg-dns.conf

# 仅监听隧道口
interface=wg0
listen-address=10.8.0.1
bind-interfaces
no-resolv
# 上游你可选 Cloudflare/Google/Quad9 等
server=1.1.1.1
server=1.0.0.1
cache-size=1000

启动并自启:

systemctl enable --now dnsmasq

方案二:纯 UCI 手工(多路由表 + ip rule)

1) 同上先建 3 条 WG 接口(与方案一相同),保持 route_allowed_ips '0'

2) 自定义路由表与规则(/etc/config/network)

# 路由表 101/102/103:默认走各自的 wg 接口
config route
  option interface 'wgA'
  option target '0.0.0.0'
  option netmask '0.0.0.0'
  option table '101'

config rule
  option src '192.168.10.0/24'
  option lookup '101'
  option priority '1010'

config route
  option interface 'wgB'
  option target '0.0.0.0'
  option netmask '0.0.0.0'
  option table '102'

config rule
  option src '192.168.20.0/24'
  option lookup '102'
  option priority '1020'

config route
  option interface 'wgC'
  option target '0.0.0.0'
  option netmask '0.0.0.0'
  option table '103'

config rule
  option src '192.168.30.0/24'
  option lookup '103'
  option priority '1030'

/etc/init.d/network restart

3):给每个表加“默认走 wgX”的路由(/etc/config/network)

##### 表101:默认经 wgA #####
config route
  option interface 'wgA'
  option target '0.0.0.0'
  option netmask '0.0.0.0'
  option table '101'          # => ip route add default dev wgA table 101

#(如用IPv6,同样建一条默认路由到 wgA)
# config route6
#   option interface 'wgA'
#   option target '::'
#   option netmask '0'
#   option table '101'

##### 表102:默认经 wgB #####
config route
  option interface 'wgB'
  option target '0.0.0.0'
  option netmask '0.0.0.0'
  option table '102'          # => default dev wgB

# config route6
#   option interface 'wgB'
#   option target '::'
#   option netmask '0'
#   option table '102'

##### 表103:默认经 wgC #####
config route
  option interface 'wgC'
  option target '0.0.0.0'
  option netmask '0.0.0.0'
  option table '103'          # => default dev wgC

# config route6
#   option interface 'wgC'
#   option target '::'
#   option netmask '0'
#   option table '103'

用策略规则把各源网段指向对应表(/etc/config/network)

##### LAN10 -> 表101 -> wgA #####
config rule
  option src '192.168.10.0/24'
  option lookup '101'
  option priority '1010'

##### LAN20 -> 表102 -> wgB #####
config rule
  option src '192.168.20.0/24'
  option lookup '102'
  option priority '1020'

##### LAN30 -> 表103 -> wgC #####
config rule
  option src '192.168.30.0/24'
  option lookup '103'
  option priority '1030'

编辑 /etc/iproute2/rt_tables 末尾追加:

101 t_wgA
102 t_wgB
103 t_wgC

应用并自检

/etc/init.d/network restart

# 查看规则与表
ip rule
ip route show table 101
ip route show table 102
ip route show table 103

# 看 WG 是否在传数据
wg show
MAC 制造商

1, 美国用 Netgear, 英国用British Telecommunications plc

美国: 前缀 00:1B:2F → 例:00:1B:2F:11:61:70       //NETGEAR            
英国: 前缀 00:00:DB → 例:00:00:DB:01:23:45       //British Telecommunications plc

查询网址: https://maclookup.app/

OpenWrt 安装Tun

OpenWrt 默认没有 modprobe,所以一般要先安装:

opkg update
opkg install kmod-tun

检查设备节点

ls -l /dev/net/tun

正常情况下应该有:

crw-rw-rw-    1 root     root      10, 200 Aug 20 20:20 /dev/net/tun

如果没有,说明 TUN 设备未启用

openwrt 安装 tcpdump 用于抓包, 在路由器中查看是否劫持客户端电脑的DNS

opkg update
# 体积小:功能裁剪版(多数场景够用)
opkg install tcpdump-mini

# 或者安装完整版(建议,过滤器/解析功能更全)
opkg install tcpdump

路由器抓包看 WAN 口是否有 53 出去

tcpdump -ni eth_wan 'port 53'
tcpdump -ni eth0 'udp and port 443'
tcpdump -ni any icmp          # IPv4 ICMP
tcpdump -ni any proto 50      # ESP
tcpdump -ni any udp port 500 or udp port 4500  # IKE/NAT-T

先确认规则是否在生效、是否有命中

1) 列出 nft 规则

# 全部规则
nft list ruleset

# 只看你截图里的“dnsmasq”那张表
nft list table inet dnsmasq

# 带 handle 和计数器(建议看这个)
nft -a list chain inet dnsmasq prerouting

如果规则里没有 counter,可以临时加一个(或用 LuCI 加),便于看命中数是否在增长:

nft add rule inet dnsmasq prerouting udp dport 53 counter redirect to :53
# ↑ 只是示例,实际以你的规则为准

实时追踪一条 DNS 包是否命中

nft monitor trace

另一个终端执行 nslookup,然后观察 trace 是否显示命中 dnsmasq/prerouting 的 redirect 规则

3) 看 WAN 口是否还有 53 流量(最终验证)

tcpdump -ni <你的WAN口> 'port 53'
# 比如 pppoe-wan/eth0/eth1 等

能看到去 8.8.8.8 的 53 包 → 劫持没有命中。

完全看不到 53 → 劫持成功(即使你在 LAN 口仍能看到目的为 8.8.8.8 的“原始”包)。

4):

A. 追踪路由器自身 → 127.0.0.1:11302 的流量

# 1) 先开一个终端:
nft monitor trace

# 2) 在另一个终端,把打标规则插到 inet fw4 的 output 链最前面(确保能被命中)
nft insert rule inet fw4 output oifname "lo" udp dport {53,11301,11302} meta nftrace set 1
nft insert rule inet fw4 output oifname "lo" tcp dport {53,11301,11302} meta nftrace set 1
# 如有 IPv6 也会走 lo,这两条已覆盖,无需额外加 ip/ip6 条件

# 3) 再做一次 nslookup(指向 127.0.0.1:11302)
nslookup www.google.com 127.0.0.1#11302
# 此时 monitor 窗口应当开始滚动,显示命中的表/链/规则及 verdict

清理(用 handle 删除你刚插入的规则):

nft -a list chain inet fw4 output | grep nftrace
nft delete rule inet fw4 output handle <handle号>

B. 追踪“LAN 客户端的 DNS 被 NAT 重定向到 11302”的路径

(这才会经过你关心的 PREROUTING/DNAT 规则)

在路由器上打标 prerouting + 来自 LAN 的 53 端口,然后从 LAN 电脑 发起查询(别指向 127.0.0.1,而是随便写 8.8.8.8:53 或默认 DNS):

# 1) 监控窗口
nft monitor trace

# 2) 打标(把 br-lan 改成你的 LAN 接口名)
nft insert rule inet fw4 prerouting iifname "br-lan" udp dport 53 meta nftrace set 1
nft insert rule inet fw4 prerouting iifname "br-lan" tcp dport 53 meta nftrace set 1

# 3) 在 LAN 电脑上执行:
nslookup www.google.com 8.8.8.8
# 现在 monitor 会显示:进入 inet/fw4 的 prerouting → 命中 DNAT/redirect → 继续到本机 11302 的轨迹

清理同上,用 handle 删除。

nft -a list chain inet fw4 prerouting | grep nftrace
nft delete rule inet fw4 prerouting handle <handle号>

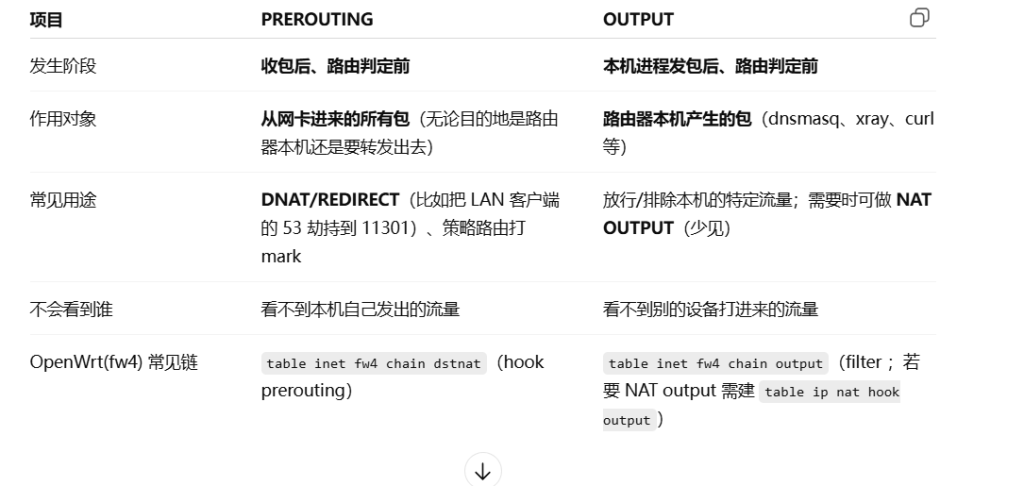
5): 两种链的对比

三条典型路径(帮助你定位问题)

  1. LAN 客户端 → 路由器本机 DNS (53)
    (ingress br-lan) → PREROUTING → (路由决策) → INPUT

想劫持它:在 PREROUTINGREDIRECT/DNAT → 11301/11302

  1. LAN 客户端 → 互联网(转发)
    (ingress br-lan) → PREROUTING → FORWARD → POSTROUTING → (egress wan)

常在 PREROUTING 打 mark/TProxy,POSTROUTING 做 SNAT/MASQUERADE

  1. 路由器本机进程 → 上游(如 dnsmasq → 1.1.1.1:53)
    (本机进程) → OUTPUT → POSTROUTING → (egress wan)

想“拦/排除”本机发出的 DNS,在 OUTPUT 上做;PREROUTING 是拦不到的。

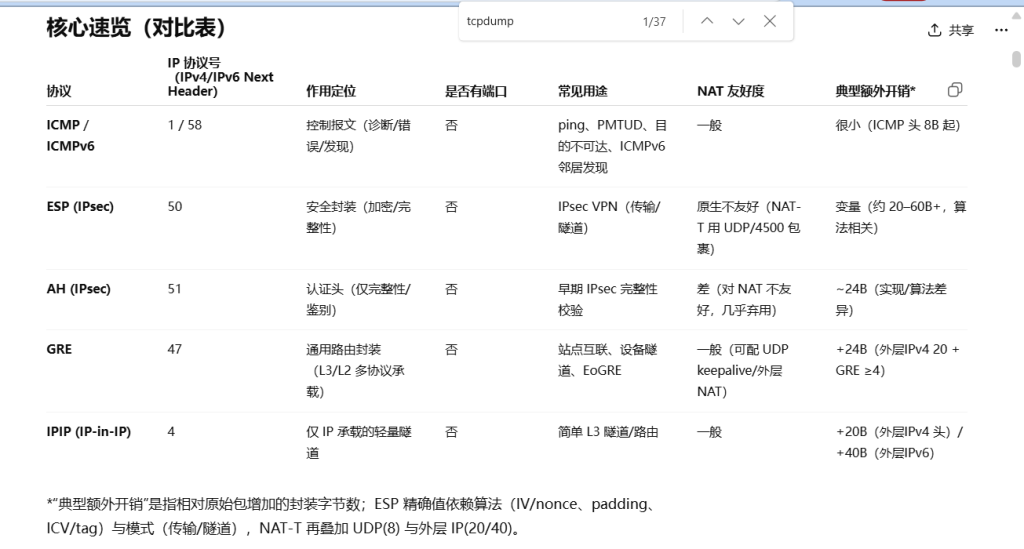
6): 禁掉/旁路 非 TCP/UDP 对公网(ICMP/ESP/AH/GRE/NTP 等

方式一:用 LuCI(图形界面)加“流量规则”

目标:仅限制某台买家设备(举例 192.168.111.50)从 LAN → WAN 的非 TCP/UDP;另外单独拦截 NTP(UDP/123),避免侧向校时泄露。

  1. 打开:网络 → 防火墙 → 流量规则 → 添加
    • 名称:Block non-TCP/UDP to WAN (buyer)
    • 家族:IPv4/IPv6(任意)
    • 协议:自定义,填:icmp ah esp gre
    • 源区域:lan
    • 源IP:192.168.111.50(或你买家设备的 IP / 子网)
    • 目标区域:wan
    • 动作:丢弃(DROP)拒绝(REJECT)
    • 保存并应用
  2. 再加一条IPv6 的 ICMPv6(因为上面“icmp”不涵盖 v6 的 ICMPv6)
    • 名称:Block ICMPv6 to WAN (buyer)
    • 家族:仅 IPv6
    • 协议:icmp(在 IPv6 家族下就是 ICMPv6)
    • 其它同上 → 丢弃
  3. 可选:拦截 NTP(若你不希望该设备对公网校时)
    • 名称:Block NTP (buyer)
    • 家族:IPv4/IPv6(任意)
    • 协议:udp
    • 目标端口:123
    • 源区域:lan,源IP:192.168.111.50,目标区域:wan
    • 动作:拒绝(REJECT 更直观,应用会立即得到失败)

说明:这些规则只影响 LAN→WAN 的转发,不影响你在路由器本机上 ping/管理,也不影响 LAN 内互访。


方式二:命令行(UCI 一把梭)

把下面整段贴进 SSH 里(把 IP 改成你的买家设备 IP;如用整段 VLAN/子网,可把 src_ip 改成 192.168.111.0/24):

# 1) 阻断 IPv4/IPv6 的非 TCP/UDP 协议到 WAN(icmp/ah/esp/gre)
uci add firewall rule
uci set firewall.@rule[-1].name='Block-non-TCP_UDP-to-WAN'
uci set firewall.@rule[-1].src='lan'
uci set firewall.@rule[-1].src_ip='192.168.111.50'
uci set firewall.@rule[-1].dest='wan'
uci set firewall.@rule[-1].proto='icmp ah esp gre'
uci set firewall.@rule[-1].target='DROP'
uci set firewall.@rule[-1].family='any'

# 2) 补一条 ICMPv6(icmp 在 family:any 下未必涵盖 v6)
uci add firewall rule
uci set firewall.@rule[-1].name='Block-ICMPv6-to-WAN'
uci set firewall.@rule[-1].src='lan'
uci set firewall.@rule[-1].src_ip='192.168.111.50'
uci set firewall.@rule[-1].dest='wan'
uci set firewall.@rule[-1].proto='icmp'
uci set firewall.@rule[-1].family='ipv6'
uci set firewall.@rule[-1].target='DROP'

# 3) 可选:拦截 NTP(UDP/123)
uci add firewall rule
uci set firewall.@rule[-1].name='Block-NTP-to-WAN'
uci set firewall.@rule[-1].src='lan'
uci set firewall.@rule[-1].src_ip='192.168.111.50'
uci set firewall.@rule[-1].dest='wan'
uci set firewall.@rule[-1].proto='udp'
uci set firewall.@rule[-1].dest_port='123'
uci set firewall.@rule[-1].target='REJECT'
uci set firewall.@rule[-1].family='any'

uci commit firewall
/etc/init.d/firewall restart

R4S 重新写 TF 卡镜像

1, 先用lsblk 命令, 查看存储卡的启动盘情况

NAME SIZE MOUNTPOINTS
loop0 1.7G /overlay
mmcblk1 29.7G
├─mmcblk1p1 32M /mnt/mmcblk1p1
└─mmcblk1p2 2G /rom

2, 不用电脑 TF 读卡器,直接写TF盘,如果是img.gz文件

scp immortalwrt-24.10.2-rockchip-armv8-friendlyarm_nanopi-r4s-ext4-sysupgrade.img.gz [email protected]:/tmp/


gunzip -c /tmp/immortalwrt-rockchip-armv8-friendlyarm_nanopi-r4s-ext4.img.gz | dd of=/dev/mmcblk1 bs=4M conv=fsync
sync
reboot

3,  如果你拿到的是 sysupgrade.bin 而不是 img.gz,可以只写 rootfs 分区:

dd if=/tmp/immortalwrt-rockchip-armv8-friendlyarm_nanopi-r4s-squashfs-sysupgrade.bin of=/dev/mmcblk1p2 bs=4M conv=fsync
sync
reboot

R4S + 小米 AP VLAN 多 SSID

1, 在 R4S 侧:为连接到小米路由器的那根网线口(比如 eth1)创建多个 VLAN 接口:

eth1.10 → VLAN10 英国节点
eth1.20 → VLAN20 美国节点
eth1.30 → VLAN30 德国节点

每个 VLAN 接口走 Passwall 对应节点。

2, 在小米路由器侧:

无线 AP1 绑定 VLAN10
无线 AP2 绑定 VLAN20
无线 AP3 绑定 VLAN30

这样物理网线只有一根,但 VLAN Tag 把流量隔离出来

3, R4S openwrt上的配置文件

假设你的小米路由器那根网线接在 R4S 的 eth1 上,你可以在 /etc/config/network 添加:

config device
    option name 'eth1.10'
    option type '8021q'
    option ifname 'eth1'
    option vid '10'

config interface 'vlan10'
    option device 'eth1.10'
    option proto 'static'
    option ipaddr '192.168.10.1'
    option netmask '255.255.255.0'

config device
    option name 'eth1.20'
    option type '8021q'
    option ifname 'eth1'
    option vid '20'

config interface 'vlan20'
    option device 'eth1.20'
    option proto 'static'
    option ipaddr '192.168.20.1'
    option netmask '255.255.255.0'

config device
    option name 'eth1.30'
    option type '8021q'
    option ifname 'eth1'
    option vid '30'

config interface 'vlan30'
    option device 'eth1.30'
    option proto 'static'
    option ipaddr '192.168.30.1'
    option netmask '255.255.255.0'

这样会在 eth1 上打 VLAN 10、20、30 三个 Tag,分别对应英国 / 美国 / 德国节点。

配置 /etc/config/dhcp

config dhcp 'vlan10'
    option interface 'vlan10'
    option start '100'
    option limit '150'
    option leasetime '12h'

config dhcp 'vlan20'
    option interface 'vlan20'
    option start '100'
    option limit '150'
    option leasetime '12h'

config dhcp 'vlan30'
    option interface 'vlan30'
    option start '100'
    option limit '150'
    option leasetime '12h'


配置 /etc/config/firewall

config zone
        option name 'lan'
        option input 'ACCEPT'
        option output 'ACCEPT'
        option forward 'ACCEPT'
        list network 'vlan10'
        list network 'vlan20'
        list network 'vlan30'

4, 小米openwrt中的配置

典型端口名:eth0/eth1,桥 br-lan,用 bridge-vlans 管理。
假设你用 LAN1 口接 R4S,这个 LAN1 要作为 trunk(tagged 10/20/30)。

a): /etc/config/network

### 把 lan 口做成桥,并在桥里定义 VLAN
config device
  option name 'br-lan'
  option type 'bridge'
  list ports 'lan1'
  list ports 'lan2'
  list ports 'lan3'
  list ports 'lan4'
  # 注:如果你只有 2 个 LAN,就保留实际存在的端口

### 定义 bridge-vlans:把 LAN1 设为 trunk(tagged),其他 LAN 可不承载这些 VLAN(或留空)
config bridge-vlan
  option device 'br-lan'
  option vlan '10'
  list ports 'lan1:t'     # trunk:往R4S的这根口
  # 如需在本机插线测试 untagged 出 VLAN10,可加 'lan2:u*'

config bridge-vlan
  option device 'br-lan'
  option vlan '20'
  list ports 'lan1:t'

config bridge-vlan
  option device 'br-lan'
  option vlan '30'
  list ports 'lan1:t'

### 给 AP(无线)侧各建一个不带 IP 的接口(桥到对应 VLAN)
config interface 'ap1_vlan10'
  option device 'br-lan.10'
  option proto 'none'        # Unmanaged,不分配IP

config interface 'ap2_vlan20'
  option device 'br-lan.20'
  option proto 'none'

config interface 'ap3_vlan30'
  option device 'br-lan.30'
  option proto 'none'

说明:

  • br-lan.10/20/30 是桥上的 VLAN 子接口
  • ap*_vlan* 接口用 proto none(Unmanaged),只做二层桥接,不跑 IP。
  • LAN1 是接 R4S 的干道口(tagged 10/20/30)。你也可以换成 WAN 口,但需要把 WAN 并入 br-lan,不建议新手这么做。

b): /etc/config/wireless

config wifi-device 'radio0'
  option type 'mac80211'
  option path 'pci/.../wifi0'   # 系统自动生成的就行
  option band '5g'
  option htmode 'HE80'
  option channel 'auto'
  option country 'US'           # 按需修改法规域

### AP1 → 绑到 VLAN10
config wifi-iface
  option device 'radio0'
  option mode 'ap'
  option ssid 'AP1-UK'
  option network 'ap1_vlan10'
  option encryption 'psk2'
  option key 'yourpassword1'
  option isolate '1'            # 客户端隔离可选

### AP2 → 绑到 VLAN20
config wifi-iface
  option device 'radio0'
  option mode 'ap'
  option ssid 'AP2-US'
  option network 'ap2_vlan20'
  option encryption 'psk2'
  option key 'yourpassword2'
  option isolate '1'

### AP3 → 绑到 VLAN30
config wifi-iface
  option device 'radio0'
  option mode 'ap'
  option ssid 'AP3-DE'
  option network 'ap3_vlan30'
  option encryption 'psk2'
  option key 'yourpassword3'
  option isolate '1'

c): /etc/config/dhcp(关闭本机 DHCP)

config dhcp 'lan'
  option interface 'lan'
  option ignore '1'      # 不在AP上发DHCP

# 可把其它段都忽略
config dhcp 'ap1_vlan10'
  option interface 'ap1_vlan10'
  option ignore '1'

config dhcp 'ap2_vlan20'
  option interface 'ap2_vlan20'
  option ignore '1'

config dhcp 'ap3_vlan30'
  option interface 'ap3_vlan30'
  option ignore '1'

d): /etc/config/firewall

# 作为纯AP,最简单是把防火墙功能整体关掉,或全部接口并入lan,仅作二层桥
config defaults
  option syn_flood '1'
  option input 'ACCEPT'
  option output 'ACCEPT'
  option forward 'ACCEPT'

# 清理 wan/masquerade/NAT 等(或直接停用 firewall 服务)

5, 与 R4S 的对接(一定要对应一致)

你之前在 R4S 上已经创建了:
eth1.10(英国)、eth1.20(美国)、eth1.30(德国),并在 Passwall 里按接口分流。

小米这边 trunk 口(lan1:t) 就要接到 R4S 的 eth1

VLAN ID 必须一一对应

  • 小米 AP1 → VLAN 10 ↔ R4S eth1.10
  • 小米 AP2 → VLAN 20 ↔ R4S eth1.20
  • 小米 AP3 → VLAN 30 ↔ R4S eth1.30

6, 应用与排错

应用配置:

/etc/init.d/network restart
wifi reload
# 或重启整机

常见排错:

  • 连接不上某个 SSID → 检查该 SSID 绑定的 network 是否是对应的 br-lan.XX/eth0.XX
  • 终端拿不到 IP → 确认 DHCP 在 R4S 或你指定的地方开启(本机 AP 侧应关闭)。
  • VLAN 不通 → 核对干道口两端是否都为 tagged 同一 VLAN ID
  • 只能上默认出口 → 看 R4S 的 Passwall 是否已按 接口/Zone 绑定节点,并允许该 VLAN 接口通过。

dnsmasq 多实例配置

dnsmasq 被阻塞

Recv-Q 显示 181536,大量 UDP 请求已到达内核但未被 dnsmasq 读取,极大异常

多实例监听配置错误(多个实例监听相同地址端口)

查看所有 dnsmasq 进程:

ps -ef | grep dnsmasq

确保每个 dnsmasq 实例 监听互不冲突的接口/IP/端口

MosDNS v5 分流自定义配置文件

这是文件 “/etc/mosdns/config_custom.yaml” 的内容,您的 MosDNS 配置将从此文件生成。仅接受 yaml 格式的配置内容。

log:
  level: info
  file: "/var/log/mosdns.log"

plugins:
                
  - tag: ddnslist
    type: domain_set
    args:
      files:
        - "/etc/mosdns/rule/ddnslist.txt"

  # 缓存
  - tag: lazy_cache
    type: cache
    args:
      size: 400
      lazy_cache_ttl: 60
      dump_file: "/etc/mosdns/cache.dump"
      dump_interval: 500

  # 转发至本地服务器
  - tag: forward_local
    type: forward
    args:
      concurrent: 2
      upstreams:
        - addr: '119.29.29.29'
          bootstrap: '119.29.29.29'
          enable_pipeline: false
          insecure_skip_verify: false
          idle_timeout: 30
          
        - addr: '223.5.5.5'
          bootstrap: '119.29.29.29'
          enable_pipeline: false
          insecure_skip_verify: false
          idle_timeout: 30  
          
  # 转发至远程服务器
  - tag: forward_remote
    type: forward
    args:
      concurrent: 
      upstreams:
        - tag: google_doh
          addr: "https://dns.google/dns-query"
          dial_addr: "8.8.8.8"
          bootstrap: "8.8.8.8"
          idle_timeout: 30
          socks5: "127.0.0.1:1083"          
        - addr: 'tcp://8.8.8.8'
          idle_timeout: 30
          socks5: '127.0.0.1:1083'
          enable_pipeline: true


  # 国内解析
  - tag: local_sequence
    type: sequence
    args:
      - exec: $forward_local

  # 国外解析
  - tag: remote_sequence
    type: sequence
    args:
      - exec: prefer_ipv4
      - exec: $forward_remote

  # 有响应终止返回
  - tag: has_resp_sequence
    type: sequence
    args:
      - matches: has_resp
        exec: accept


  - tag: query_is_local
    type: sequence
    args:
      - exec: $local_sequence

  # fallback 用远程服务器 sequence
  - tag: query_is_remote
    type: sequence
    args:
      - exec: $remote_sequence

  # fallback 用远程服务器 sequence
  - tag: fallback
    type: fallback
    args:
      primary: query_is_remote
      secondary: query_is_remote
      threshold: 30000
      always_standby: false


  - tag: query_is_ddns_domain
    type: sequence
    args:
      - matches: qname $ddnslist
        exec: $forward_local

  # 主要的运行逻辑插件
  # sequence 插件中调用的插件 tag 必须在 sequence 前定义,
  # 否则 sequence 找不到对应插件。
  - tag: main_sequence
    type: sequence
    args:
      - matches:
          - '!qname $ddnslist'
        exec: $lazy_cache
      - exec: $query_is_ddns_domain
      - exec: jump has_resp_sequence
      - exec: $fallback

  # 启动 udp 服务器。
  - tag: udp_server
    type: udp_server
    args:
      entry: main_sequence
      listen: ":5135"
     
  - tag: tcp_server
    type: tcp_server
    args:
      entry: main_sequence
      listen: ':5135'

其中/etc/mosdns/rule/ddnslist.txt 中

MosDNS Rules

*.cpolar.top
cpolar.top
cpolard.cpolar.com
cpolar.com
*.cpolar.com
regexp:(^|\.)cpolar\.top$

MosDns 解决DNS泄漏问题

问题: 有3个节点 A: 英国 B: 美国 C: 德国 . 要通过节点转发DNS 请求, 这样避免DNS请求被”墙“,或者被劫持。如何利用MosDns 配合Passwall 完成操作?

解决方案:

1: Passwall 开3个Socks 端口分别对应3个节点。 A: sock5: 1083 B: sock5:1084 C: sock5:1085 , 并且修改配置文件 /etc/config/passwall

config acl_rule
        option enabled '1'
        option remarks 'L1'
        option interface 'L1'
        option sources '192.168.101.0/24'
        option tcp_no_redir_ports 'disable'
        option udp_no_redir_ports 'disable'
        option use_global_config '0'
        option tcp_node 'oCQMCVBg'
        option udp_node 'tcp'
        option tcp_proxy_drop_ports 'disable'
        option udp_proxy_drop_ports 'disable'
        option tcp_redir_ports '1:65535'
        option udp_redir_ports '1:65535'
        option use_direct_list '0'
        option use_proxy_list '0'
        option use_block_list '0'
        option use_gfw_list '0'
        option chn_list '0'
        option tcp_proxy_mode 'proxy'
        option udp_proxy_mode 'proxy'
        option dns_shunt 'dnsmasq'
        option dns_mode 'tcp'
        option dnsmasq_dns_redirect '0'
        option remote_dns '127.0.0.1:5135'

config acl_rule
        option enabled '1'
        option remarks 'L2'
        option interface 'L2'
        option sources '192.168.102.0/24'
        option tcp_no_redir_ports 'disable'
        option udp_no_redir_ports 'disable'
        option use_global_config '0'
        option tcp_node 'XxxWUfAC'
        option udp_node 'tcp'
        option tcp_proxy_drop_ports 'disable'
        option udp_proxy_drop_ports 'disable'
        option tcp_redir_ports '1:65535'
        option udp_redir_ports '1:65535'
        option use_direct_list '0'
        option use_proxy_list '0'
        option use_block_list '0'
        option use_gfw_list '0'
        option chn_list '0'
        option tcp_proxy_mode 'proxy'
        option udp_proxy_mode 'proxy'
        option dns_shunt 'tcp'
        option dns_mode 'tcp'
        option dnsmasq_dns_redirect '0'
        option remote_dns '127.0.0.1:5136'

config acl_rule
        option enabled '1'
        option remarks 'L3'
        option interface 'L3'
        option sources '192.168.103.0/24'
        option tcp_no_redir_ports 'disable'
        option udp_no_redir_ports 'disable'
        option use_global_config '0'
        option tcp_node 'AI7uCLje'
        option udp_node 'tcp'
        option tcp_proxy_drop_ports 'disable'
        option udp_proxy_drop_ports 'disable'
        option tcp_redir_ports '1:65535'
        option udp_redir_ports '1:65535'
        option use_direct_list '0'
        option use_proxy_list '0'
        option use_block_list '0'
        option use_gfw_list '0'
        option chn_list '0'
        option tcp_proxy_mode 'proxy'
        option udp_proxy_mode 'proxy'
        option dns_shunt 'dnsmasq'
        option dns_mode 'tcp'
        option dnsmasq_dns_redirect '0'
        option remote_dns '127.0.0.1:5137'


2: MosDNS 开3个实例, 每个实例监听不同端口 A: 5135 B: 5136 C: 5137

A 实例配置(监听端口 5135,SOCKS5 代理 127.0.0.1:1083)

文件名示例:config_A.yaml

log:
  level: info
  file: "/tmp/mosdns_a.log"

plugins:
  - tag: forward_remote
    type: forward
    args:
      concurrent: 1 
      upstreams:
        - tag: google_doh
          addr: "https://dns.google/dns-query"
          dial_addr: "8.8.8.8"
          bootstrap: "8.8.8.8"
          idle_timeout: 30
          socks5: "127.0.0.1:1083"         
        - addr: "tcp://8.8.8.8"         
          idle_timeout: 30
          socks5: "127.0.0.1:1083"  
          enable_pipeline: true

  - tag: main_sequence
    type: sequence
    args:
      - exec: $forward_remote

  - tag: udp_server
    type: udp_server
    args:
      entry: main_sequence
      listen: ":5135"

  - tag: tcp_server
    type: tcp_server
    args:
      entry: main_sequence
      listen: ":5135"


B 实例配置(监听端口 5136,SOCKS5 代理 127.0.0.1:1084)

文件名示例:config_B.yaml

log:
  level: info
  file: "/tmp/mosdns_b.log"

plugins:
  - tag: forward_remote
    type: forward
    args:
      concurrent: 1 
      upstreams:
        - tag: google_doh
          addr: "https://dns.google/dns-query"
          dial_addr: "8.8.8.8"
          bootstrap: "8.8.8.8"
          idle_timeout: 30
          socks5: "127.0.0.1:1084"         
        - addr: "tcp://8.8.8.8"         
          idle_timeout: 30
          socks5: "127.0.0.1:1084"  
          enable_pipeline: true

  - tag: main_sequence
    type: sequence
    args:
      - exec: $forward_remote

  - tag: udp_server
    type: udp_server
    args:
      entry: main_sequence
      listen: ":5136"

  - tag: tcp_server
    type: tcp_server
    args:
      entry: main_sequence
      listen: ":5136"


C 实例配置(监听端口 5137,SOCKS5 代理 127.0.0.1:1085)

文件名示例:config_C.yaml

log:
  level: info
  file: "/tmp/mosdns_c.log"

plugins:
  - tag: forward_remote
    type: forward
    args:
      concurrent: 1 
      upstreams:
        - tag: google_doh
          addr: "https://dns.google/dns-query"
          dial_addr: "8.8.8.8"
          bootstrap: "8.8.8.8"
          idle_timeout: 30
          socks5: "127.0.0.1:1085"         
        - addr: "tcp://8.8.8.8"         
          idle_timeout: 30
          socks5: "127.0.0.1:1085"  
          enable_pipeline: true

  - tag: main_sequence
    type: sequence
    args:
      - exec: $forward_remote

  - tag: udp_server
    type: udp_server
    args:
      entry: main_sequence
      listen: ":5137"

  - tag: tcp_server
    type: tcp_server
    args:
      entry: main_sequence
      listen: ":5137"


MosDNS 三实例 init 脚本合集,适用于 OpenWRT,分别控制 A/B/C 实例。

1. /etc/init.d/mosdns_a

#!/bin/sh /etc/rc.common
#
# Copyright (C) 2020-2022, IrineSistiana
#
# This file is part of mosdns.
#
# mosdns is free software: you can redistribute it and/or modify
# it under the terms of the GNU General Public License as published by
# the Free Software Foundation, either version 3 of the License, or
# (at your option) any later version.
#
# mosdns is distributed in the hope that it will be useful,
# but WITHOUT ANY WARRANTY; without even the implied warranty of
# MERCHANTABILITY or FITNESS FOR A PARTICULAR PURPOSE.  See the
# GNU General Public License for more details.
#
# You should have received a copy of the GNU General Public License
# along with this program.  If not, see <https://www.gnu.org/licenses/>.
#

START=99
USE_PROCD=1

#####  ONLY CHANGE THIS BLOCK  ######
PROG=/usr/bin/mosdns # where is mosdns
RES_DIR=/etc/mosdns/ # resource dir / working dir / the dir where you store ip/domain lists
CONF=./config_A.yaml   # where is the config file, it can be a relative path to $RES_DIR
#####  ONLY CHANGE THIS BLOCK  ######

start_service() {
  procd_open_instance
  procd_set_param command $PROG start -d $RES_DIR -c $CONF

  procd_set_param user root
  procd_set_param stdout 1
  procd_set_param stderr 1
  procd_set_param respawn "${respawn_threshold:-3600}" "${respawn_timeout:-5}" "${respawn_retry:-5}"
  procd_close_instance
  echo "mosdns is started!"
}

reload_service() {
  stop
  sleep 2s
  echo "mosdns is restarted!"
  start
}

2. /etc/init.d/mosdns_b

#!/bin/sh /etc/rc.common
#
# Copyright (C) 2020-2022, IrineSistiana
#
# This file is part of mosdns.
#
# mosdns is free software: you can redistribute it and/or modify
# it under the terms of the GNU General Public License as published by
# the Free Software Foundation, either version 3 of the License, or
# (at your option) any later version.
#
# mosdns is distributed in the hope that it will be useful,
# but WITHOUT ANY WARRANTY; without even the implied warranty of
# MERCHANTABILITY or FITNESS FOR A PARTICULAR PURPOSE.  See the
# GNU General Public License for more details.
#
# You should have received a copy of the GNU General Public License
# along with this program.  If not, see <https://www.gnu.org/licenses/>.
#

START=99
USE_PROCD=1

#####  ONLY CHANGE THIS BLOCK  ######
PROG=/usr/bin/mosdns # where is mosdns
RES_DIR=/etc/mosdns/ # resource dir / working dir / the dir where you store ip/domain lists
CONF=./config_B.yaml   # where is the config file, it can be a relative path to $RES_DIR
#####  ONLY CHANGE THIS BLOCK  ######

start_service() {
  procd_open_instance
  procd_set_param command $PROG start -d $RES_DIR -c $CONF

  procd_set_param user root
  procd_set_param stdout 1
  procd_set_param stderr 1
  procd_set_param respawn "${respawn_threshold:-3600}" "${respawn_timeout:-5}" "${respawn_retry:-5}"
  procd_close_instance
  echo "mosdns is started!"
}

reload_service() {
  stop
  sleep 2s
  echo "mosdns is restarted!"
  start
}

3. /etc/init.d/mosdns_c

#!/bin/sh /etc/rc.common
#
# Copyright (C) 2020-2022, IrineSistiana
#
# This file is part of mosdns.
#
# mosdns is free software: you can redistribute it and/or modify
# it under the terms of the GNU General Public License as published by
# the Free Software Foundation, either version 3 of the License, or
# (at your option) any later version.
#
# mosdns is distributed in the hope that it will be useful,
# but WITHOUT ANY WARRANTY; without even the implied warranty of
# MERCHANTABILITY or FITNESS FOR A PARTICULAR PURPOSE.  See the
# GNU General Public License for more details.
#
# You should have received a copy of the GNU General Public License
# along with this program.  If not, see <https://www.gnu.org/licenses/>.
#

START=99
USE_PROCD=1

#####  ONLY CHANGE THIS BLOCK  ######
PROG=/usr/bin/mosdns # where is mosdns
RES_DIR=/etc/mosdns/ # resource dir / working dir / the dir where you store ip/domain lists
CONF=./config_C.yaml   # where is the config file, it can be a relative path to $RES_DIR
#####  ONLY CHANGE THIS BLOCK  ######

start_service() {
  procd_open_instance
  procd_set_param command $PROG start -d $RES_DIR -c $CONF

  procd_set_param user root
  procd_set_param stdout 1
  procd_set_param stderr 1
  procd_set_param respawn "${respawn_threshold:-3600}" "${respawn_timeout:-5}" "${respawn_retry:-5}"
  procd_close_instance
  echo "mosdns is started!"
}

reload_service() {
  stop
  sleep 2s
  echo "mosdns is restarted!"
  start
}

统一控制脚本 /etc/init.d/mosdns_all,可以用来同时启动、停止、重启 MosDNS 的 A、B、C 三个实例。

/etc/init.d/mosdns_all

#!/bin/sh /etc/rc.common
# Unified control for MosDNS A, B, C instances

START=96
STOP=9

start() {
    echo "Starting all MosDNS instances..."
    /etc/init.d/mosdns_a start
    /etc/init.d/mosdns_b start
    /etc/init.d/mosdns_c start
}

stop() {
    echo "Stopping all MosDNS instances..."
    /etc/init.d/mosdns_a stop
    /etc/init.d/mosdns_b stop
    /etc/init.d/mosdns_c stop
}

restart() {
    echo "Restarting all MosDNS instances..."
    /etc/init.d/mosdns_a restart
    /etc/init.d/mosdns_b restart
    /etc/init.d/mosdns_c restart
}

使用方式:

chmod +x /etc/init.d/mosdns_all
/etc/init.d/mosdns_all enable
/etc/init.d/mosdns_all start    # 启动全部
/etc/init.d/mosdns_all stop     # 停止全部
/etc/init.d/mosdns_all restart  # 重启全部